> ## Documentation Index
> Fetch the complete documentation index at: https://docs.apigene.ai/llms.txt
> Use this file to discover all available pages before exploring further.
# Applications
> Install, configure, and manage API integrations
## Overview
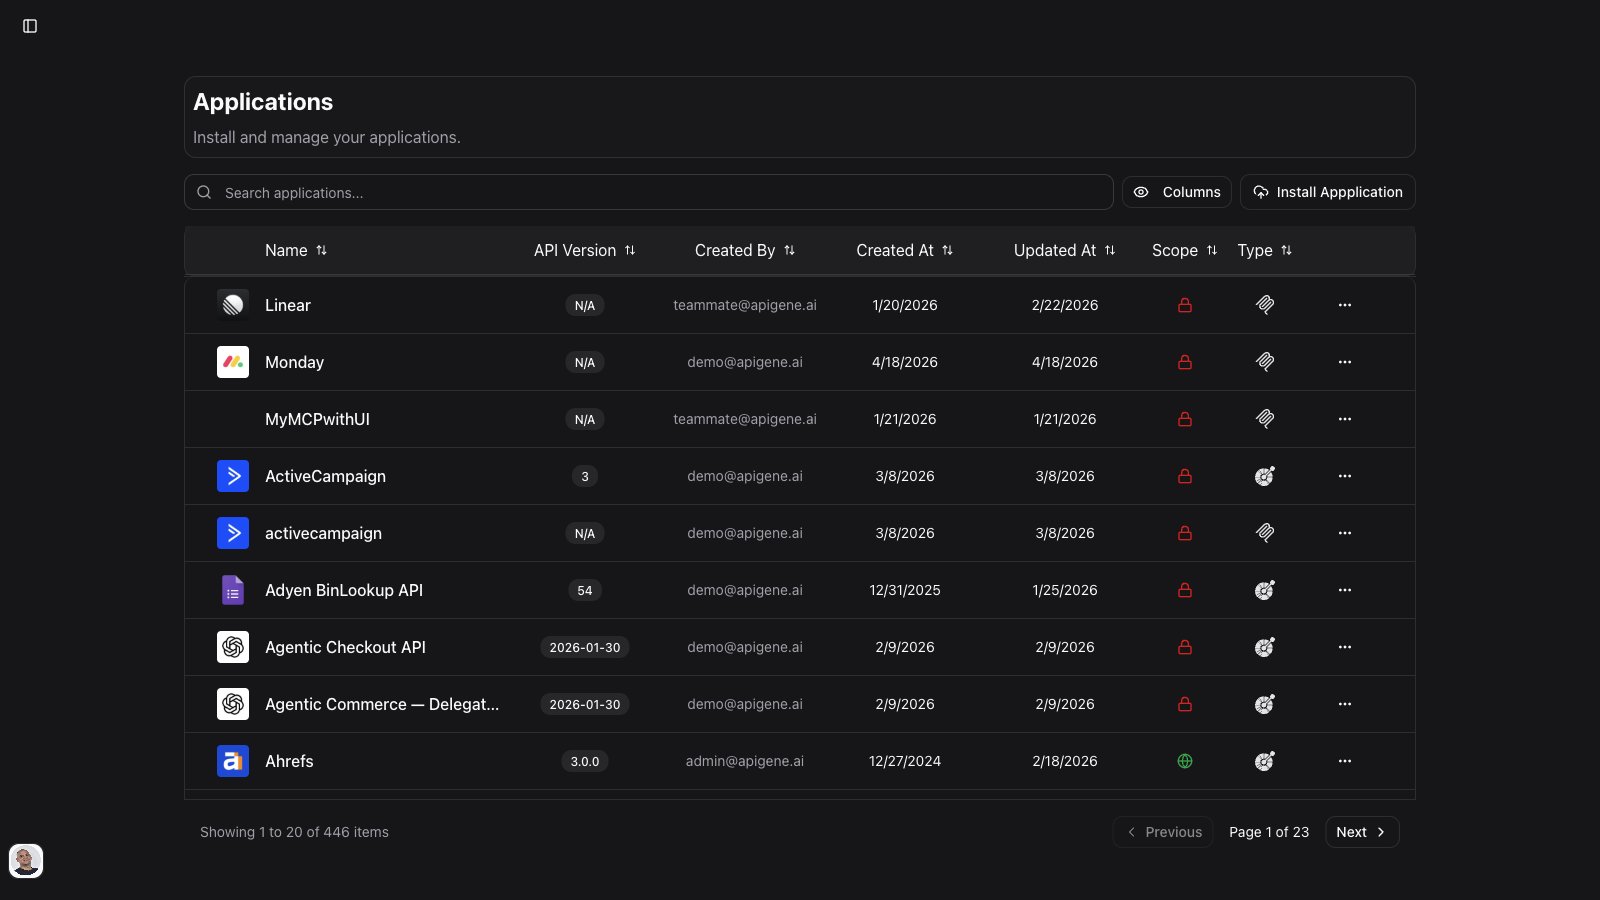
Applications are the foundation of Apigene Copilot. Each application represents an API or service that Copilot can interact with on your behalf. By installing and configuring applications, you enable AI-powered interactions with your tools and services.
 ## What Are Applications?
Applications are API integrations based on OpenAPI specifications. They provide:
* **API Operations**: Individual endpoints the AI can call
* **MCP Tools**: AI-friendly tools generated from API operations
* **Security Configuration**: Authentication and credential management
* **Metadata**: Context and descriptions for better AI understanding
## Application Lifecycle
### Discovery
Browse available applications or add custom ones
### Installation
Add the application to your workspace
### Configuration
Set up authentication and customize behavior
### Usage
Use the application in Copilot conversations
## Installing Applications
When you click **+ Install Application**, choose:
* **OpenAPI based** — import from URL, file, or **Postman collection**
* **MCP Server** — opens the [official native MCP catalog](/user-guide/mcp-servers#install-from-the-official-catalog) (not an OpenAPI install)
### Method 1: From OpenAPI URL
Install applications directly from a URL:
1. Navigate to **Applications** page
2. Click **+ Install Application** button
3. Choose **OpenAPI based**, then **From URL**
4. Enter the OpenAPI specification URL
```
https://api.example.com/openapi.json
```
5. Click **Install**
**Supported Formats**
* JSON (`.json`)
* YAML (`.yaml`, `.yml`)
* OpenAPI 2.0 (Swagger)
* OpenAPI 3.0
* OpenAPI 3.1
### Method 2: Upload File
Install from a local OpenAPI specification file:
1. Navigate to **Applications** page
2. Click **+ Install Application** button
3. Choose **OpenAPI based**, then **From File**
4. Click to select or drag and drop your file
5. Click **Install**
**File Requirements**
* Valid OpenAPI specification
* Maximum size: 10MB
* Formats: JSON or YAML
### Method 3: From Postman Collection
Install from a Postman collection. Apigene converts the collection to OpenAPI, then runs the normal application install and reindex flow.
1. Navigate to **Applications** → **+ Install Application**
2. Choose **OpenAPI based**
3. Select **From Postman**
4. Upload your Postman collection file (JSON)
5. Wait for conversion and install to finish
6. Configure **Security** before making live calls
Conversion depends on collection structure. Nested folders become tags where possible. Review generated operations after install and reindex if tool metadata looks incomplete.
### Method 4: Native MCP Server
To connect a remote MCP server instead of an OpenAPI spec:
1. Choose **MCP Server** on the install screen, **or** open **MCP** in the main nav
2. Follow [Native MCP Servers](/user-guide/mcp-servers) — official catalog, registry, or custom URL
### Installation Process
When you install an OpenAPI-based application, Apigene:
1. **Checks LLM configuration**
* Installing or reindexing an application requires at least one model provider configured for the organization
* If no provider is configured, complete [Settings → AI Models](/user-guide/settings) first, then retry
2. **Validates the specification** (or converts Postman → OpenAPI first)
3. **Creates agentic metadata**
* Generates tool descriptions
* Extracts parameter information
* Creates operation summaries
4. **Initializes configuration**
* Sets up security placeholders
* Creates default settings
* Prepares for first use
The installation typically takes 10-30 seconds depending on the API size.
## Configuring Applications
After installation, configure your application for use:
### General Settings
Access via **Applications** > \[Application Name] > **General** tab
**Basic Information**
* **API Name**: Unique identifier (read-only)
* **API Title**: Display name for the application
* **Description**: What the application does
* **Version**: API version (from specification)
* **Domain URL**: Base URL for API calls
**Visibility**
* **Private**: Only you can use it
* **Organization**: Available to your team
* Toggle visibility as needed
### Security Configuration
Access via **Applications** > \[Application Name] > **Security** tab
This is the most critical configuration step. Without proper security setup, the application cannot make API calls.
#### Authentication Types
**API Key**
```
Security Scheme: API Key
Location: Header / Query Parameter / Cookie
Parameter Name: X-API-Key (example)
Configuration:
- Enter your API key
- Specify where it should be sent
- Save credentials
```
**Bearer Token**
```
Security Scheme: HTTP Bearer
Format: JWT (typical)
Configuration:
- Enter your bearer token
- Token is sent in Authorization header
- Refresh tokens if needed
```
**OAuth 2.0**
```
Security Scheme: OAuth2
Flow: Authorization Code / Client Credentials
Configuration:
- Client ID
- Client Secret
- Authorization URL
- Token URL
- Scopes (permissions needed)
```
**Basic Authentication**
```
Security Scheme: HTTP Basic
Encoding: Base64 (username:password)
Configuration:
- Username
- Password
- Automatically encoded
```
**Custom Authentication**
```
Security Scheme: Custom headers
Configuration:
- Add any custom headers required
- Support for multiple headers
- Dynamic value substitution
```
#### Security Setup Steps
1. **Identify Authentication Method**
* Check application documentation
* Look at the Security tab
* Note required credentials
2. **Obtain Credentials**
* Generate API keys from provider
* Complete OAuth flow if needed
* Get service account credentials
3. **Configure in Apigene**
* Enter credentials in Security tab
* Test connection if available
* Save configuration
4. **Verify Setup**
* Use application in Copilot
* Check for authentication errors
* Update if credentials expire
### API Operations
Access via **Applications** > \[Application Name] > **Operations** tab
View and manage all available API endpoints:
**Operation List**
* Method (GET, POST, PUT, DELETE, etc.)
* Path (e.g., `/api/v1/users`)
* Summary description
* Tags for organization
**Operation Details**
* Full description
* Parameters (path, query, body)
* Request examples
* Response schemas
* Status codes
**Search and Filter**
* Search by operation name
* Filter by HTTP method
* Filter by tags
* Sort by various criteria
### MCP Tools Configuration
Access via **Applications** > \[Application Name] > **MCP Tools** tab
MCP (Model Context Protocol) tools are AI-optimized versions of your API operations.
**Tool Information**
* Tool name (e.g., `github_create_issue`)
* Description for AI understanding
* Required parameters
* Optional parameters
* Success criteria
**Customization Options**
* Edit tool descriptions
* Modify parameter hints
* Add usage examples
* Set default values
* Adjust inputs, response handling, and UI templates where available
**Tool Generation**
* Automatically created during installation
* One tool per API operation
* Can be regenerated via **reindex** (see below)
* Updates reflect in Copilot after reindex completes
### Reindex and agentic metadata
Reindex regenerates MCP tool metadata from the current OpenAPI specification. Use it when:
* You updated the OpenAPI spec
* Tool descriptions look stale or incomplete
* Install finished but metadata is still generating
* Postman conversion produced a coarse operation set you refined in the spec
**How to reindex**
1. Open **Applications** → select the application
2. Use the **MCP Tools** / metadata area **Reindex** action
3. Watch status: queued → in progress → success or failure
4. Keep an organization model provider configured — reindex requires LLM access for agentic metadata
While reindex runs, the UI may show progress labels such as “Reindexing queued” or “Reindexing in progress”. Do not delete the application mid-run.
OpenAPI applications are exposed as Apigene MCP tools for agents and the gateway. That is separate from installing a [native MCP server](/user-guide/mcp-servers). Programmatic creation of an MCP server record from an API name is also available via the [MCP Server API](/api-reference/mcp-server/mcp-create-from-api).
### Common Parameters
Access via **Applications** > \[Application Name] > **Common Parameters** tab
Set default values for parameters used across multiple operations:
**Use Cases**
* Organization ID (consistent across all calls)
* API version preference
* Response format preferences
* Default pagination limits
**Configuration**
* Parameter name
* Default value
* Apply to all operations or specific ones
* Override in individual calls if needed
**Benefits**
* Reduce repetitive input
* Ensure consistency
* Simplify Copilot interactions
* Minimize errors
## Managing Applications
### Application List
The Applications page shows all installed applications:
**Information Displayed**
* Application icon (auto-generated from domain)
* Application name and title
* Description
* Security status (configured ✓ / not configured ⚠️)
* Installation date
**Actions**
* Click to view/edit details
* Delete application
* Refresh metadata
* Export configuration
### Searching Applications
Use the search bar to find applications:
* Search by name
* Search by description
* Filter results in real-time
### Updating Applications
When APIs change, update your applications:
1. Go to application details
2. Click **Update Specification**
3. Provide new URL or file
4. Review changes
5. Save updates
**What Gets Updated**
* New operations added
* Removed operations deprecated
* Modified parameters reflected
* Security schemes updated
* MCP tools regenerated
### Deleting Applications
Remove applications you no longer need:
1. Navigate to Applications page
2. Find the application
3. Click the delete icon
4. Confirm deletion
**Impact of Deletion**
* All configuration is removed
* MCP tools become unavailable
* Copilot conversations can no longer use it
* Agents using this application will show errors
* Historical data is retained
## Application Status Indicators
### Security Status
**✓ Configured** (Green)
* Authentication is set up
* Application is ready to use
* API calls will succeed
**⚠️ Not Configured** (Red)
* Missing credentials
* Application cannot make API calls
* Configuration required
**🔄 Needs Update** (Yellow)
* Credentials may be expired
* Security scheme changed
* Reconfiguration recommended
### Connection Status
**Connected** (Green)
* Successfully making API calls
* Credentials are valid
* Service is reachable
**Failed** (Red)
* Authentication errors
* Network issues
* Service unavailable
**Untested** (Gray)
* Not yet used in conversations
* Status unknown
* Test needed
## Best Practices
### Installation
**Choose Quality Specifications**
* Use official OpenAPI specs when available
* Verify specification completeness
* Check for recent updates
**Name Consistently**
* Use clear, recognizable names
* Include version if relevant
* Follow team naming conventions
### Configuration
**Secure Credential Management**
* Use service accounts when possible
* Rotate credentials regularly
* Don't share credentials publicly
* Use environment-specific keys (dev/prod)
**Test After Configuration**
* Make a simple API call in Copilot
* Verify authentication works
* Check returned data format
* Confirm permissions are sufficient
### Maintenance
**Monitor Usage**
* Check Dashboard for application usage
* Identify unused applications
* Review API call success rates
* Monitor for errors
**Keep Updated**
* Update specifications when APIs change
* Review security configurations quarterly
* Remove deprecated applications
* Document configuration changes
**Optimize Performance**
* Set common parameters to reduce overhead
* Configure only necessary operations
* Use appropriate authentication methods
* Monitor rate limits
## Advanced Features
### Custom Operation Metadata
Enhance AI understanding of operations:
```yaml theme={null}
Operation: createUser
Enhanced Description: |
Creates a new user account in the system.
Requirements:
- Email must be unique
- Password must be at least 8 characters
- Username can only contain alphanumeric characters
Returns the created user object with auto-generated ID.
Example usage:
"Create a new user with email john@example.com"
```
### Parameter Templates
Create reusable parameter sets:
```yaml theme={null}
Template: CreateIssue
Parameters:
project_id: "PROJ"
priority: "medium"
issue_type: "task"
Usage:
"Create an issue in PROJ with these defaults"
```
### Response Transformation
Configure how responses are displayed:
* **Full Response**: Show complete JSON
* **Summary**: Show key fields only
* **Custom Format**: Define what to extract
* **Error Handling**: Custom error messages
### Webhook Integration
For supported applications:
* Configure webhook endpoints
* Receive real-time updates
* Trigger automated workflows
* Enable event-driven actions
## Troubleshooting
### Installation Fails
**Invalid Specification**
* Verify OpenAPI format
* Use validation tools
* Check for syntax errors
* Ensure all required fields present
**Network Errors**
* Check URL accessibility
* Verify no authentication required for spec
* Try downloading and uploading as file
* Check firewall settings
### Authentication Issues
**401 Unauthorized**
* Verify credentials are correct
* Check if tokens have expired
* Confirm account has API access
* Review authentication method
**403 Forbidden**
* Check account permissions
* Verify required scopes granted
* Contact service administrator
* Review API access policies
### API Calls Failing
**Network Errors**
* Check internet connection
* Verify API service is online
* Review firewall rules
* Check for rate limiting
**Invalid Parameters**
* Review required vs optional parameters
* Check parameter data types
* Verify parameter formats
* Review API documentation
**Response Errors**
* Check API status page
* Review error messages
* Verify data format expectations
* Check for breaking changes in API
## Next Steps
* [Use applications in Copilot](/user-guide/copilot) to execute API operations
* [Create agents](/user-guide/agents) with specific application access
* [Monitor usage](/user-guide/dashboard) in the dashboard
* [View API call logs](/user-guide/actions) for debugging
## What Are Applications?
Applications are API integrations based on OpenAPI specifications. They provide:
* **API Operations**: Individual endpoints the AI can call
* **MCP Tools**: AI-friendly tools generated from API operations
* **Security Configuration**: Authentication and credential management
* **Metadata**: Context and descriptions for better AI understanding
## Application Lifecycle
### Discovery
Browse available applications or add custom ones
### Installation
Add the application to your workspace
### Configuration
Set up authentication and customize behavior
### Usage
Use the application in Copilot conversations
## Installing Applications
When you click **+ Install Application**, choose:
* **OpenAPI based** — import from URL, file, or **Postman collection**
* **MCP Server** — opens the [official native MCP catalog](/user-guide/mcp-servers#install-from-the-official-catalog) (not an OpenAPI install)
### Method 1: From OpenAPI URL
Install applications directly from a URL:
1. Navigate to **Applications** page
2. Click **+ Install Application** button
3. Choose **OpenAPI based**, then **From URL**
4. Enter the OpenAPI specification URL
```
https://api.example.com/openapi.json
```
5. Click **Install**
**Supported Formats**
* JSON (`.json`)
* YAML (`.yaml`, `.yml`)
* OpenAPI 2.0 (Swagger)
* OpenAPI 3.0
* OpenAPI 3.1
### Method 2: Upload File
Install from a local OpenAPI specification file:
1. Navigate to **Applications** page
2. Click **+ Install Application** button
3. Choose **OpenAPI based**, then **From File**
4. Click to select or drag and drop your file
5. Click **Install**
**File Requirements**
* Valid OpenAPI specification
* Maximum size: 10MB
* Formats: JSON or YAML
### Method 3: From Postman Collection
Install from a Postman collection. Apigene converts the collection to OpenAPI, then runs the normal application install and reindex flow.
1. Navigate to **Applications** → **+ Install Application**
2. Choose **OpenAPI based**
3. Select **From Postman**
4. Upload your Postman collection file (JSON)
5. Wait for conversion and install to finish
6. Configure **Security** before making live calls
Conversion depends on collection structure. Nested folders become tags where possible. Review generated operations after install and reindex if tool metadata looks incomplete.
### Method 4: Native MCP Server
To connect a remote MCP server instead of an OpenAPI spec:
1. Choose **MCP Server** on the install screen, **or** open **MCP** in the main nav
2. Follow [Native MCP Servers](/user-guide/mcp-servers) — official catalog, registry, or custom URL
### Installation Process
When you install an OpenAPI-based application, Apigene:
1. **Checks LLM configuration**
* Installing or reindexing an application requires at least one model provider configured for the organization
* If no provider is configured, complete [Settings → AI Models](/user-guide/settings) first, then retry
2. **Validates the specification** (or converts Postman → OpenAPI first)
3. **Creates agentic metadata**
* Generates tool descriptions
* Extracts parameter information
* Creates operation summaries
4. **Initializes configuration**
* Sets up security placeholders
* Creates default settings
* Prepares for first use
The installation typically takes 10-30 seconds depending on the API size.
## Configuring Applications
After installation, configure your application for use:
### General Settings
Access via **Applications** > \[Application Name] > **General** tab
**Basic Information**
* **API Name**: Unique identifier (read-only)
* **API Title**: Display name for the application
* **Description**: What the application does
* **Version**: API version (from specification)
* **Domain URL**: Base URL for API calls
**Visibility**
* **Private**: Only you can use it
* **Organization**: Available to your team
* Toggle visibility as needed
### Security Configuration
Access via **Applications** > \[Application Name] > **Security** tab
This is the most critical configuration step. Without proper security setup, the application cannot make API calls.
#### Authentication Types
**API Key**
```
Security Scheme: API Key
Location: Header / Query Parameter / Cookie
Parameter Name: X-API-Key (example)
Configuration:
- Enter your API key
- Specify where it should be sent
- Save credentials
```
**Bearer Token**
```
Security Scheme: HTTP Bearer
Format: JWT (typical)
Configuration:
- Enter your bearer token
- Token is sent in Authorization header
- Refresh tokens if needed
```
**OAuth 2.0**
```
Security Scheme: OAuth2
Flow: Authorization Code / Client Credentials
Configuration:
- Client ID
- Client Secret
- Authorization URL
- Token URL
- Scopes (permissions needed)
```
**Basic Authentication**
```
Security Scheme: HTTP Basic
Encoding: Base64 (username:password)
Configuration:
- Username
- Password
- Automatically encoded
```
**Custom Authentication**
```
Security Scheme: Custom headers
Configuration:
- Add any custom headers required
- Support for multiple headers
- Dynamic value substitution
```
#### Security Setup Steps
1. **Identify Authentication Method**
* Check application documentation
* Look at the Security tab
* Note required credentials
2. **Obtain Credentials**
* Generate API keys from provider
* Complete OAuth flow if needed
* Get service account credentials
3. **Configure in Apigene**
* Enter credentials in Security tab
* Test connection if available
* Save configuration
4. **Verify Setup**
* Use application in Copilot
* Check for authentication errors
* Update if credentials expire
### API Operations
Access via **Applications** > \[Application Name] > **Operations** tab
View and manage all available API endpoints:
**Operation List**
* Method (GET, POST, PUT, DELETE, etc.)
* Path (e.g., `/api/v1/users`)
* Summary description
* Tags for organization
**Operation Details**
* Full description
* Parameters (path, query, body)
* Request examples
* Response schemas
* Status codes
**Search and Filter**
* Search by operation name
* Filter by HTTP method
* Filter by tags
* Sort by various criteria
### MCP Tools Configuration
Access via **Applications** > \[Application Name] > **MCP Tools** tab
MCP (Model Context Protocol) tools are AI-optimized versions of your API operations.
**Tool Information**
* Tool name (e.g., `github_create_issue`)
* Description for AI understanding
* Required parameters
* Optional parameters
* Success criteria
**Customization Options**
* Edit tool descriptions
* Modify parameter hints
* Add usage examples
* Set default values
* Adjust inputs, response handling, and UI templates where available
**Tool Generation**
* Automatically created during installation
* One tool per API operation
* Can be regenerated via **reindex** (see below)
* Updates reflect in Copilot after reindex completes
### Reindex and agentic metadata
Reindex regenerates MCP tool metadata from the current OpenAPI specification. Use it when:
* You updated the OpenAPI spec
* Tool descriptions look stale or incomplete
* Install finished but metadata is still generating
* Postman conversion produced a coarse operation set you refined in the spec
**How to reindex**
1. Open **Applications** → select the application
2. Use the **MCP Tools** / metadata area **Reindex** action
3. Watch status: queued → in progress → success or failure
4. Keep an organization model provider configured — reindex requires LLM access for agentic metadata
While reindex runs, the UI may show progress labels such as “Reindexing queued” or “Reindexing in progress”. Do not delete the application mid-run.
OpenAPI applications are exposed as Apigene MCP tools for agents and the gateway. That is separate from installing a [native MCP server](/user-guide/mcp-servers). Programmatic creation of an MCP server record from an API name is also available via the [MCP Server API](/api-reference/mcp-server/mcp-create-from-api).
### Common Parameters
Access via **Applications** > \[Application Name] > **Common Parameters** tab
Set default values for parameters used across multiple operations:
**Use Cases**
* Organization ID (consistent across all calls)
* API version preference
* Response format preferences
* Default pagination limits
**Configuration**
* Parameter name
* Default value
* Apply to all operations or specific ones
* Override in individual calls if needed
**Benefits**
* Reduce repetitive input
* Ensure consistency
* Simplify Copilot interactions
* Minimize errors
## Managing Applications
### Application List
The Applications page shows all installed applications:
**Information Displayed**
* Application icon (auto-generated from domain)
* Application name and title
* Description
* Security status (configured ✓ / not configured ⚠️)
* Installation date
**Actions**
* Click to view/edit details
* Delete application
* Refresh metadata
* Export configuration
### Searching Applications
Use the search bar to find applications:
* Search by name
* Search by description
* Filter results in real-time
### Updating Applications
When APIs change, update your applications:
1. Go to application details
2. Click **Update Specification**
3. Provide new URL or file
4. Review changes
5. Save updates
**What Gets Updated**
* New operations added
* Removed operations deprecated
* Modified parameters reflected
* Security schemes updated
* MCP tools regenerated
### Deleting Applications
Remove applications you no longer need:
1. Navigate to Applications page
2. Find the application
3. Click the delete icon
4. Confirm deletion
**Impact of Deletion**
* All configuration is removed
* MCP tools become unavailable
* Copilot conversations can no longer use it
* Agents using this application will show errors
* Historical data is retained
## Application Status Indicators
### Security Status
**✓ Configured** (Green)
* Authentication is set up
* Application is ready to use
* API calls will succeed
**⚠️ Not Configured** (Red)
* Missing credentials
* Application cannot make API calls
* Configuration required
**🔄 Needs Update** (Yellow)
* Credentials may be expired
* Security scheme changed
* Reconfiguration recommended
### Connection Status
**Connected** (Green)
* Successfully making API calls
* Credentials are valid
* Service is reachable
**Failed** (Red)
* Authentication errors
* Network issues
* Service unavailable
**Untested** (Gray)
* Not yet used in conversations
* Status unknown
* Test needed
## Best Practices
### Installation
**Choose Quality Specifications**
* Use official OpenAPI specs when available
* Verify specification completeness
* Check for recent updates
**Name Consistently**
* Use clear, recognizable names
* Include version if relevant
* Follow team naming conventions
### Configuration
**Secure Credential Management**
* Use service accounts when possible
* Rotate credentials regularly
* Don't share credentials publicly
* Use environment-specific keys (dev/prod)
**Test After Configuration**
* Make a simple API call in Copilot
* Verify authentication works
* Check returned data format
* Confirm permissions are sufficient
### Maintenance
**Monitor Usage**
* Check Dashboard for application usage
* Identify unused applications
* Review API call success rates
* Monitor for errors
**Keep Updated**
* Update specifications when APIs change
* Review security configurations quarterly
* Remove deprecated applications
* Document configuration changes
**Optimize Performance**
* Set common parameters to reduce overhead
* Configure only necessary operations
* Use appropriate authentication methods
* Monitor rate limits
## Advanced Features
### Custom Operation Metadata
Enhance AI understanding of operations:
```yaml theme={null}
Operation: createUser
Enhanced Description: |
Creates a new user account in the system.
Requirements:
- Email must be unique
- Password must be at least 8 characters
- Username can only contain alphanumeric characters
Returns the created user object with auto-generated ID.
Example usage:
"Create a new user with email john@example.com"
```
### Parameter Templates
Create reusable parameter sets:
```yaml theme={null}
Template: CreateIssue
Parameters:
project_id: "PROJ"
priority: "medium"
issue_type: "task"
Usage:
"Create an issue in PROJ with these defaults"
```
### Response Transformation
Configure how responses are displayed:
* **Full Response**: Show complete JSON
* **Summary**: Show key fields only
* **Custom Format**: Define what to extract
* **Error Handling**: Custom error messages
### Webhook Integration
For supported applications:
* Configure webhook endpoints
* Receive real-time updates
* Trigger automated workflows
* Enable event-driven actions
## Troubleshooting
### Installation Fails
**Invalid Specification**
* Verify OpenAPI format
* Use validation tools
* Check for syntax errors
* Ensure all required fields present
**Network Errors**
* Check URL accessibility
* Verify no authentication required for spec
* Try downloading and uploading as file
* Check firewall settings
### Authentication Issues
**401 Unauthorized**
* Verify credentials are correct
* Check if tokens have expired
* Confirm account has API access
* Review authentication method
**403 Forbidden**
* Check account permissions
* Verify required scopes granted
* Contact service administrator
* Review API access policies
### API Calls Failing
**Network Errors**
* Check internet connection
* Verify API service is online
* Review firewall rules
* Check for rate limiting
**Invalid Parameters**
* Review required vs optional parameters
* Check parameter data types
* Verify parameter formats
* Review API documentation
**Response Errors**
* Check API status page
* Review error messages
* Verify data format expectations
* Check for breaking changes in API
## Next Steps
* [Use applications in Copilot](/user-guide/copilot) to execute API operations
* [Create agents](/user-guide/agents) with specific application access
* [Monitor usage](/user-guide/dashboard) in the dashboard
* [View API call logs](/user-guide/actions) for debugging